- Inviting specific contacts to your event
- Inviting multiple contacts to your event
- Offering each contact multiple seats / entries
- 3rd Party Invite Management
- Selling Tickets
- Open Registration
- Adding contacts to invite
HOW DO I INVITE SOMEONE TO ATTEND MY EVENT?
Go to the 'Emails' page. From here you can create and send three types of emails - Invites, 3rd Party Invites and General Emails. To invite an individual or list of individuals to an event you create an 'Invite'.
Note: before you can click the + Invite button you must have opened, edited and saved your default Invite and Confirmation emails. Click the buttons at the top of the Email page to do this.
Click the + Invite button. Give your invite a name.
Add recipients to your invite. You can add individual contacts or contact lists (or Salesforce lists if you have Salesforce integration).
Add a Seating Package to your invite.
Set a send time for your invite. To send out the invite(s) immediately, choose 'Immediately'. To set your invite(s) to go out at a later date / time, select your preferred times from the dropdowns.
Clicking 'Launch' will put your instructions into action. Clicking 'Hold' will save your invite in the History Table until you decide to launch it.
Note: when naming Invites, it's useful to make the name reference the individuals or contact lists included in the Invite. This might be something like 'John Brown', or 'New Target Member List'. For 3rd Party Invites this is usually the name of the Company or Group who will be managing those guests. Naming invites in this way makes them much more useful and easier to track in the Email History table, especially when you are sending out many emails.
CAN I INVITE MORE THAN ONE GUEST AT A TIME?
Yes. To invite a number of individuals, click on the 'Add A Contact' button. Select a contact and add them to the invite. To add more individuals one at a time, repeat this process as needed.
To add a whole list of contacts at one time from your database, click on the 'Add Lists' (or Salesforce Add Smartlists) button and select the contact list(s) you want to send the invite to.
Tip: When giving your Direct Invite a name, it's useful to name it something to do with the contact(s) you've included in the Invite.
CAN I OFFER GUESTS MORE THAN ONE SEAT?
Yes. By default when you set up an event, Seatrobot creates a Seating Package of one individual seat which you can add to any Invite. This gives each person you invite the opportunity to Accept or Decline one seat / place / admittance at your event.
You can create your own Seating Packages which can include any number of seats / admittances you like, as well as descriptions of other benefits etc. Click on Event Setup > Packages / Tickets. Click 'Create New' to build your own Seating Package. Any Seating Package you create here will be available to add to any of your Invites.
If you mark a Package you create as '3rd Party', it will be available only to add to a 3rd Party Invite. All other packages you create are available to add to both regular and 3rd Party Invites.
Remember - Seating Packages are offered to each individual you invite - so if you create a Seating Package of 5 seats, every single person you invite will be given 5 seats / places at your event to fill.
MY EVENT IS SPONSORED / I'M SELLING TABLES. HOW CAN MY SPONSORS / GUESTS FILL THEIR OWN TABLE?
Seatrobot calls these types of Invites 3rd Party Invites. In a 3rd Party Invite you invite an individual to be in charge of a group of seats or invites at your event (like a table) - and they fill those seats by inviting and confirming other people on your behalf. In a 3rd Party Invite you invite someone to be the Coordinator for that Invite. This individual may not be attending the event themselves.
Tip: Note: 3rd Party Invites will only appear if you have checked the '3rd Party Invites' checkbox in Event Setup > Event Info, or if you have created a Seating Package in Event Setup > Packages / Tickets and marked it as a '3rd Party' package.
Go to Emails. You must open / edit / save all the default emails in the '3rd Party Email Setup' panel. Once done, you can click the + 3rd Party button to cerate a new 3rd Party invites.
You'll choose a 'Co-ordinator'. The Co-ordinator is the 3rd party contact who will be in charge of inviting / filling their guest list on behalf of your event. They will receive an the Coordinator Welcome email with a link to their own page where they can fill add / invite guests into the places you have given them. (The number of places they have to fill will depend on the number of seats that were contained in the Seating Package you added to their Invite).
HOW DO I SELL TICKETS TO MY EVENT?
*Note: Ticketing is only available if you have registered your account for the Seatrobot ticketing module with a linked Seatrobot Stripe account. To add the Seatrobot ticketing module to your account please contact us.
When you create a new event, Seatrobot automatically creates an event ticket web page using the information and images you entered during event setup - e.g. your event name, date, venue and email header image.
You can find a link to the Ticket Page after you save your event by clicking the 'Manage Basic Ticket' button on the Event Setup > Event Info page. When you click the 'Manage Basic Ticket' button, you can enter the ticket price for your ticket and the maximum number anyone can purchase at one time. Here you will also find the URL for the ticket page for this event.
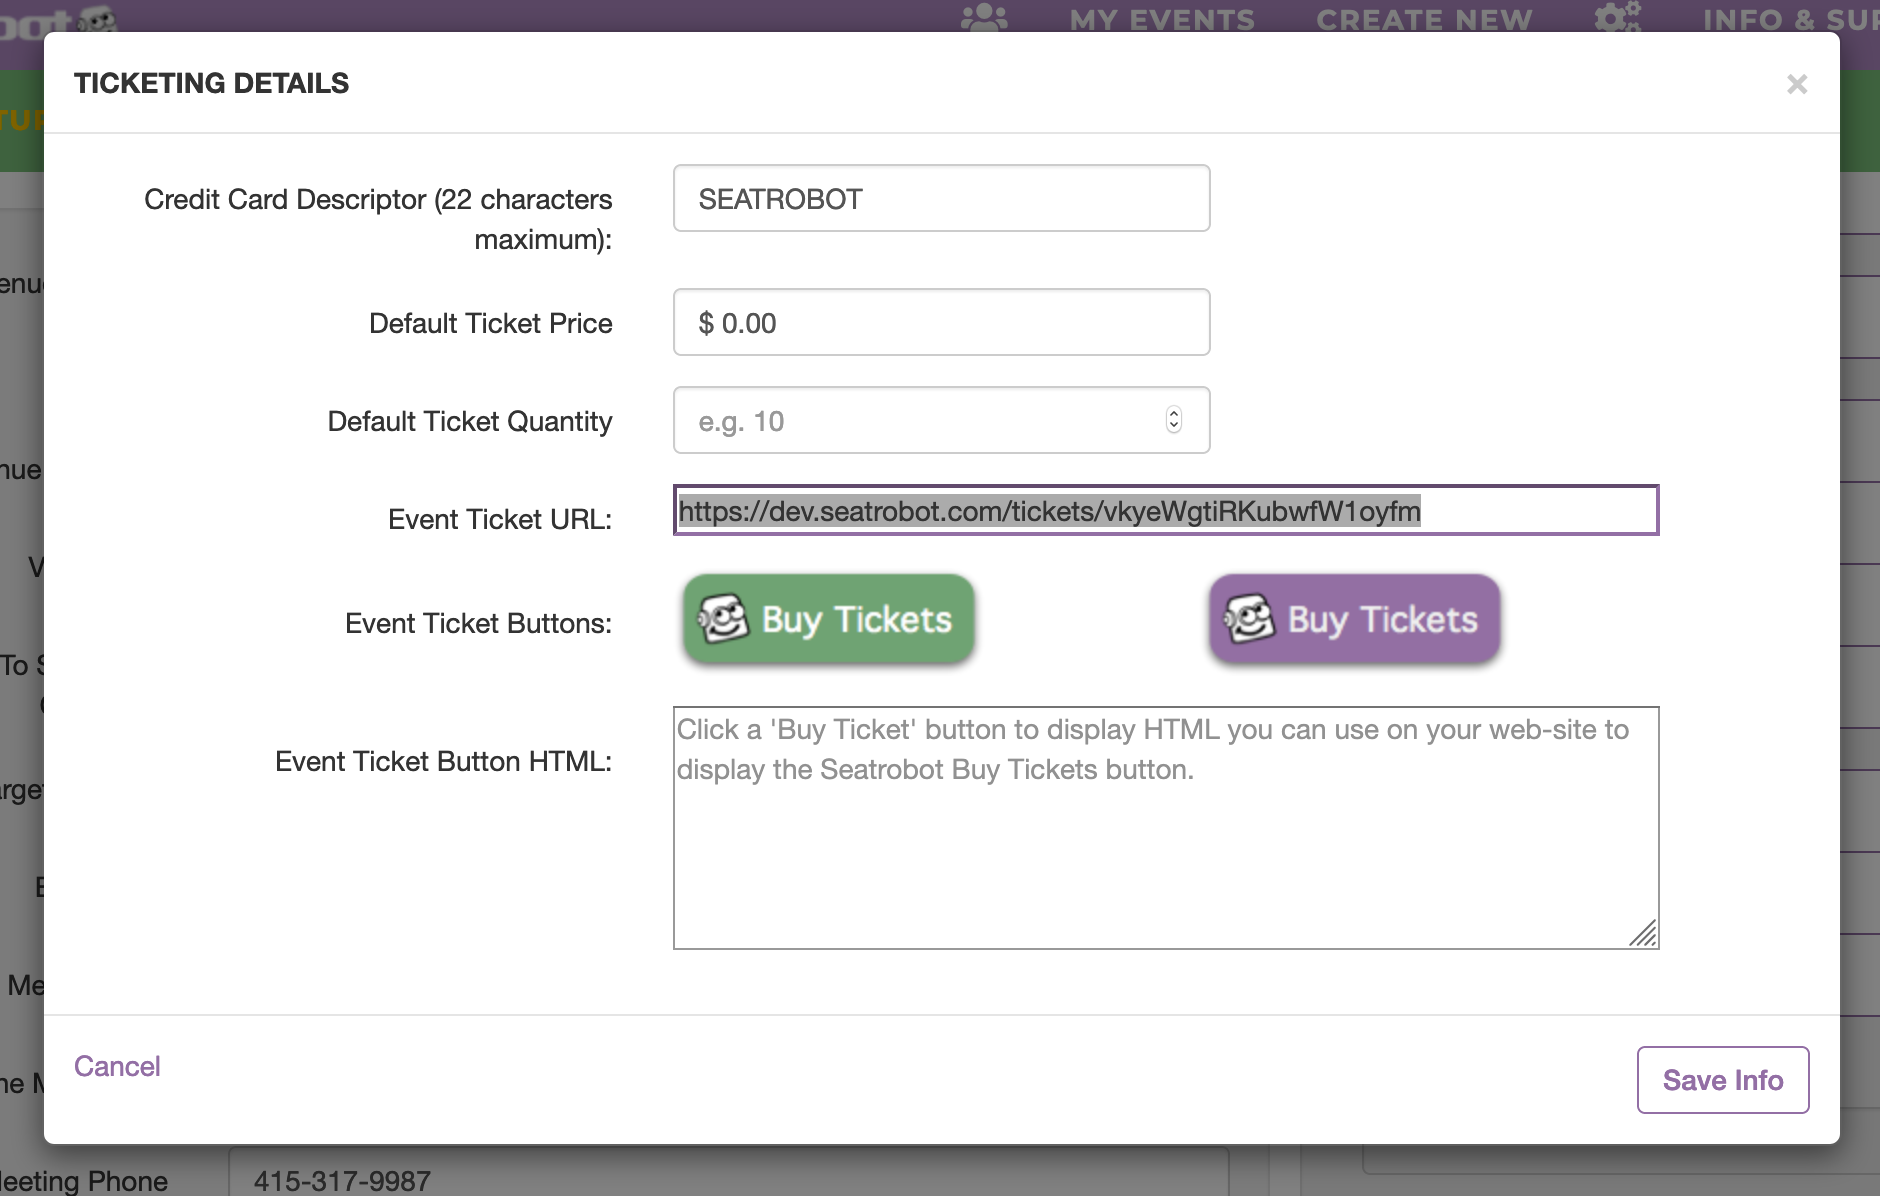
Note: you MUST use the Ticket link exactly as it appears there inside your Ticketing Details box inside your event. The expanded server web address that appears above the ticket page once this link is clicked is NOT shareable and will not re-open the page.
To create more tickets of different prices etc. Click on Event Setup > Packages / Tickets. Click 'Create New' to build your own Seating Package. Make it a ticket by checking the 'Add To Ticket Page' checkbox. Any Ticket you create here will be available on your Ticket Page.
I JUST WANT TO FILL MY EVENT. HOW CAN I GET PEOPLE TO REGISTER?
If you are organizing a free event and just want to publicize it to the general public, or friends of friends, use the Open RSVP Page URL. This is a page allowing any individual to register for your event without having to pay for a ticket. There is no mention of pricing etc. on this page.
(For creating a page to sell tickets and ticket packages see Tickets)
In Event Setup > Event Info click on the 'Manage Open RSVP Options' button. Copy the 'Open RSVP' URL from your Event Setup page and include it in emails, on your website, Facebook page etc. Seatrobot provides the HTML for placing buttons on your web pages.
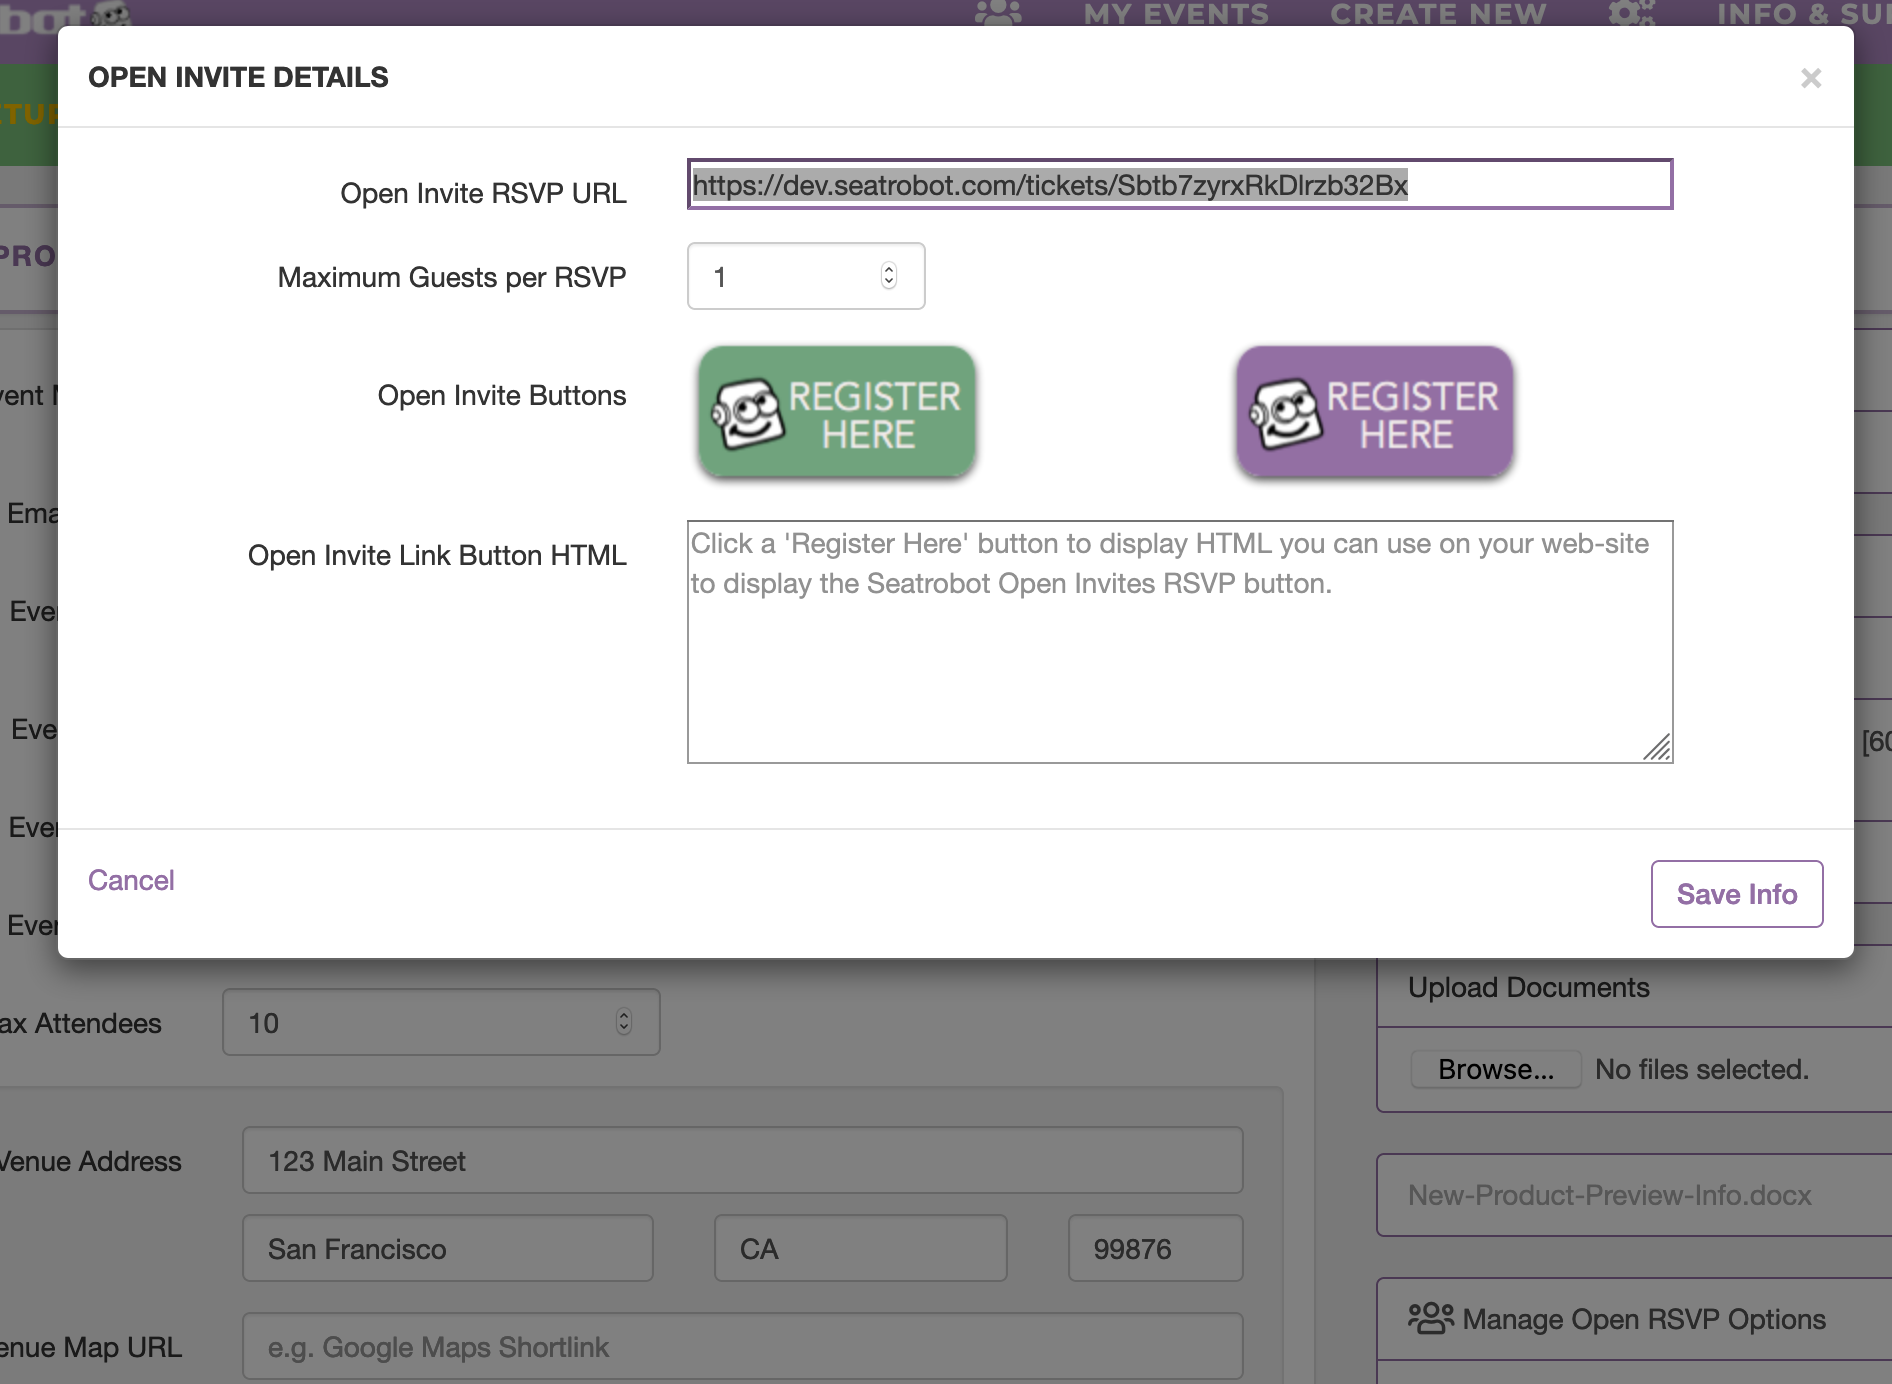
Note: you MUST use the Open RSVP link exactly as it appears there inside your Open RSVP details box inside your event. The expanded server web address that appears above the Open RSVP page once this link is clicked is NOT shareable and will not re-open the page.
HOW DO I PUT MY CONTACTS INTO SEATROBOT SO I CAN INVITE THEM?
Seatrobot contains a database of all your contacts, with powerful contact management tools. You can build this database by adding one contact at a time, or by uploading lists of contacts (from Excel files) or by linking your Seatrobot system with your CMS system (like Salesforce).
The Seatrobot contacts database is not event-specific (your contacts may be invited to any event you create). Therefore you manage contacts from your organization-level admin controls on the purple navigation bar. Click on the 'people' icon in the purple bar to access your contacts.

From here you can add individual contacts (click the single contact+ icon), or upload contact lists (click the cloud upload icon), and manage your contacts as you wish. For details on how to upload and manage contacts you have uploaded to Seatrobot, including creating contact lists, tagging contacts, filtering contacts, tracking contact histories etc. search 'contacts' in the Info Center.